Everyone has a story to tell, here's mine sprinkled with some creative projects along the way. Thank you for stopping by and I hope you come back again.
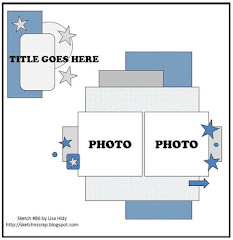
Happy Sunday guys. Hope your weekend was fun and creative. I'm here to share two layouts that I created from one sketch. I love how sketches not only provide a good jump start to a layout but if it's rotated or flipped, you can create multiple pages without them looking identical to one another. The two layouts I made were inspired by this sketch from Scrapbook challenges blog...
In this first one, I flipped it 90 degrees as I wanted the title to go on the top. I was originally going to do it the way the sketch had it but my pictures looked tiny when lined up on the left side. I angled them a little so that they can show the movement of the bike activity.
I had a project life 4x6 card that had gold foiled arrows on them and instead of using the whole sheet, I cut it out and added just the arrows on my layout.
The layout didn't really have much journaling in it other than what we see in the photo so I opted with a small handwriting of the event instead of a long story.
I used a vellum piece over my busy pattern paper to make the long title stand out even more.
With this layout, I turned the sketch making the long title block on the bottom and the three photos on the top. I also made the sketch my own by opting to move the title in the center of my two photos and leaving the bottom blank with a bold pattern paper and cut out vellum flowers on the side.
I used another project life card in this page. It housed my title and labels with handwritten journaling.
I used an old Dear Lizzy vellum and fussy cut the flowers and then added some enamel dots on some of the centers.
I'm trying to use up a sheet of quote stickers from Cosmo Cricket and I used three of them here on this page.
There you have it. Hope this inspired you to grab a sketch and make it your own.
Hi there dear friends. Today I'm sharing with you a minibook that I created recently. I haven't really done any mini book lately because 1. I am running out of room for them and 2. I felt like my pictures and stories need to be put into the albums versus in smaller books that can be lost or misplaced. But this particular event had way too many pictures and I had a hard time cramming them into one double page spread. I also wanted to challenge myself and see if I can created a minibook that is my style from a predesigned album kit. Here's the result...
You can see my process, including the items that I gathered for this project in the video below...
Here are a few things I learned from this process:
1. It is possible to create a project that is within my style from a predesigned album kit. It's just a matter of tweaking the accents or embellishments and some parts of the original layout design.
2. It was fun working with precut papers and accents. It made the process faster. I was able to get this book done in 3 hours. That's a first for me.
3. Gathering all of my items to create this book also made the process efficient. Since I have everything I needed within arms reach, I didn't have to stop my creating to rummage through my stash for items.
4. Creating a minibook helped me use up my stash faster than making a layout or two. Because I'm trying to create repetition within the pages of this book, I used some items over and over again like photo corners, stickers, pearls, etc. It helped me make a huge dent to my stash.
5. Having typed journaling to sprinkle within the pages of the book helped to ensure that the stories that can't be viewed with the photos are also added to the book.
Here are some close ups....
And there you have it. A finished mini book in under 3 hours. Thank you for stopping by and if you liked this kind of post, please leave a comment and I will make sure to make some more projects in this category.
Hello again my dear crafty friends. Today I'm sharing a layout based off of this sketch from Paper Issues blog...
It's interesting how I had a totally different vision for this layout than the final result and you can watch more of what happened to this page through my process video here...
And here are some more close ups...
Although it didn't turn out the way I had initially hoped it would be, I still like the results. That just shows you that things don't always go as planned but at the end they turn out just fine.
Hi there friends and happy Monday. Today I'm sharing a layout based off of two challenges. The first one is from this sketch at Sketch N Scrap blog.
This layout was also inspired by the latest challenge over at the Mixed Media Monthly challenge blog. The challenge this month was to create with any kind of mixed media while incorporating text.
I turned the sketch 180 degrees to conform with my picture and layout. I used a photo of my oldest son taken in 2013. I only used one photo instead of the two in the sketch. I did add lots of layered papers under the photo and matted my picture with a bold pink cardstock to make it stand out against all of the green, purple and black papers behind it.
Lately I have been wanting to be intentional with my pages. By that I mean that I will not create a page just because I had a cute photo or some products to play with. Because of this new goal, I thought long and hard about the story that I wanted to document with this page and I decided to jot down some of my feelings about how my son's smile reminded me of how much happier he was in 5th grade versus the years before because we got him an IEP set up in school. Having his diagnosis of ADHD in place helped us get the extra assistance he needed to thrive in the school environment.
For the mixed media challenge, I took one of the negative portion of some cuts I made with my silhouette. This particular one had the negative spaces of alphabets on it. I used my modeling past to add the design onto my paper. I also added some splatter of color shine to the page.
I used some wood stickers from We R Memory Keepers plus glittered stars and words from Heidi Swapp.
Thank you for stopping by and I hope you have a fantastic day,
Hi guys and happy Monday. I'm sharing my latest two page spread today and it's based off of this sketch from the Scrap Much? blog...
I only had four pictures so I used some of the other spots from the sketch to add some embellishments and I did move my journaling on the bottom since I had more room there. These photos are of my little graduation from a school program I did in order for me to get back into college. If you would like more information on it, you can click here.
I love Heidi Swapp's handwriting and I was super stoked when I saw some of her memory planner stuff on sale at Michael's last wee so I grabbed a word sticker sheet and I used one of them in this layout as my title.
I then covered one of the wood shape with pattern paper and then cut out the heart shape then backed it up with the B side of that paper to make the heart stand out even more. I also added some stickle dots on the page for more dimensions.
One of the things I loved about the sketch is the flowers. I haven't used any of my paper flowers in for-ev-er! So I thought it would be a good idea to bust them out for this layout. Bonus, I also got to use some paper leaves from Prima. Do any of you remember those? I added some Basic Grey fabric brads in the center.
I have been doing a lot of handwritten journaling lately so to mix it up, I pulled out my typewriter and got my words down that way. I love typing them up and then cutting them into strips for added design on my page.
So there you have it. Thanks for stopping by and I hope you all have a fantastic day.