Everyone has a story to tell, here's mine sprinkled with some creative projects along the way.
Thank you for stopping by and I hope you come back again.


Monday, September 14, 2015

Autumn Table Runner *Glue Dots project*

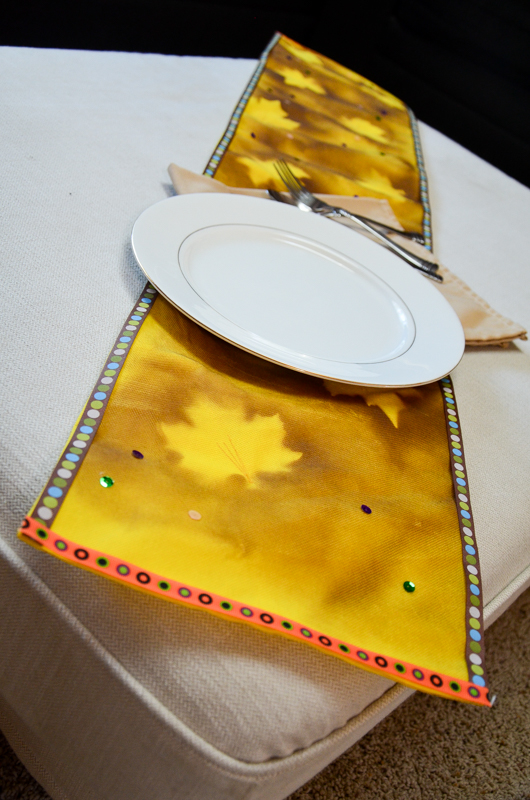
I love using the Removable, Glue Dots® adhesive as a mask. In this project, I added some autumn leave accents on my Oly Fun craft material with ease using this mask technique.
Autumn themed table runner
Designed by: Grace Tolman
Time: Approximately  1 ½ hours (including drying time for the paint)
Level: Beginner/Intermediate
Size: Approximately 3 ft x 1 foot

 Materials:
Craft material, Oly Fun (Lemon Drop)
Ribbons- Ribbon Boutique
Spray paint- Espresso, Krylon
Cardstock- Orange, Bazzill
Thread- Coats and Clark
Sequins- Source Unknown
Leaf cut file- Silhouette store
Tools:
Removable, Glue Dots®
Glue Lines, Glue Dots®
Mini, Glue Dots®
Sewing Machine- Kenmore
Scissors
Die cut machine- Cameo, Silhouette

 Directions:
1. Create a bunch of leaf share with your electronic die cut machine. Cut them out using some cardstock.
2. Cut two pieces of Oly fun craft material measuring 3 ¼ x 1 ¼ feet.
3. Take one of the craft material piece, adhere the cardstock leaf randomly on the material using some Removable, Glue Dots® adhesive. Spray the brown paint. Pull out the leaf carefully and set aside to dry.
4. Once dried, sew the two front sides of the fabrics together on three sides. Turn it over. Fold the last side and sew to close.
5. Add some veins on the leaf by sewing some straight stitches with the sewing machine.
6. Cut out ribbon to the length of the table runner. Add them to the edge of the project using some Glue Lines, Glue Dots® adhesive.
7. Add some sequins randomly on the table runner using some Mini, Glue Dots® adhesive.


Thank you for stopping by. Make sure to stop by the Glue Dots blog for more crafty inspirations.

Till next time,
Grace

Friday, September 11, 2015

"Oh Hi Dad" scrapbook page

Thank goodness it's Friday. I can't wait for the weekend. It will be my last "stress-free" weekend. I say that because school will start up again for me on Monday and this semester I will be taking three classes. I'm a little nervous as I don't know what kind of work load that will entail but I figured I needed to get my "butt" into gear so I can finish before I turned 40. Hahahaha!

This next layout is made with the latest challenge at Picture This! blog. The challenge was to use 2 photos + green + white + black. 
Here's a process video that I created to go along with the layout share...

And here are some more close ups...


Thank you so much for stopping by and I hope you have a fabulous weekend.

Till next time,
Grace

Thursday, September 10, 2015

"Hard Lesson Learned" scrapbook page

It's another layout share. I hope you guys are still liking all of the scrapbook pages that I've been sharing here. This specific one was inspired by this sketch from Grand Diva Scrappy Place

I tweaked the layout a bit to fit my page by eliminating the bunting/banner on the top and then adding some hexagon punched shapes versus the strips of paper. If you would like to see how I created this page from start to finish, please click "play" on the video below. 

Here are some more close ups....


Thank you so much for stopping by. I hope that you have a fun and creative day.

Till next time,
Grace

Wednesday, September 9, 2015

Hello Adventure layout

Happy Wednesday friends. Today I'm sharing a layout inspired by this sketch from My Creative Sketches blog. 

I love the layering in the sketch and thought it would be perfect for my page and all the scraps of paper that I still have from my homemade scrapbook kit.

Wanna see how I created this page from start to finish? Here's a video of it....

And here are some close ups....


Thank you so much for stopping by and be sure to come back soon for more layout shares.

Till next time,
Grace

Saturday, September 5, 2015

Ready and Determined layout + process video

Hello again my dear friends. Today's layout was based off of this sketch here

I was really drawn to the simple foundation of the sketch but enabled me to add layers and all sorts of accents to my masculine page. Wanna see how I created this page? Here's a process video for you...

And here are some more close ups...


Thank you so much for stopping by.

Hope to see you again soon.

Till next time,
Grace

Friday, September 4, 2015

First Family Picture layout

I had a six week break from school so I tried to focus on getting some scrapbook pages done. This week I focused on Mason's baby album. Since he's one now (time flies super fast) I know I should create the pages before the memory goes away. 

This layout share is going to be submitted to two challenges. The sketch is from Stick it Down blog and the journaling prompt, which is answering the questions "What are you most proud of?" is from the Studio challenge blog

I was drawn to the sketch because it had strips of paper on the back of a single photo. I loved how that helped me use up some scraps of paper that I've accumulated from making the rest of the pages in my baby album. 

 I have a gold foil type of cardstock in my stash which I used to cut out the cursive "family" word as well as the leaf design on the left side of my photo.
I have set aside product to use for this baby album and they are all kept in a plastic Iris container so when I get a chance to work on the album, all of my pages will have the same products, making the book have a cohesive look.

 I love the prompt and I used that to journal about how proud I am of the little family and my husband and I built together.

So there you have it. I hope that you stop by the challenge blog links and find inspiration for your next paper crafting project.

Till next time,
Grace

Little One layout

Hi friends and happy Friday. Today I'm squeezing in two layouts to share before the long weekend. They will be in two different posts but I wanted to get them posted before Labor Day weekend starts. What your plan for this holiday? Hope it's something fun. 

This layout is going to be submitted to two challenges. Scrap our Stash and Stuck?! challenge blogs have teamed up and I love how I can hit "two birds with one stone" with these kinds of challenges. 


With regards to the sketch, I flipped it and made the horizontal photos go vertical because that's the orientation of my 2 4x6 photos. I added some project life cards behind the photos to add some layering aspects. I don't do much pocket scrapbooking but have the products so might as well fit it into my 12x12 spread. 

 For the stash part of the challenge, I used the following:
L- letter chipboard
A- Arrows
Y- Yellow pattern paper
E- Echo Park stickers
R- Rhinestones
S- Silhouette cut (the "little one" in the title)

Here are some more close ups....


 Thank you so much for stopping by and have a fantastic weekend.

Till next time,
Grace

Thursday, September 3, 2015

Date Night layout + process video

Hello my crafty friends. Today's share is the first layout that I made with my September homemade scrapbook kit. Do you want to take a peek at the contents of this month's kit? Here's a video share of my stash..


This first layout is based off of this sketch here

I love that the sketch offered many options for layering. Here's a video sharing my process from start to finish...


And here are some more close ups...


Thank you so much for stopping by.

I hope you have a fantastic day.

Till next time,
Grace